Help
Instructions for Use
This section is intended for use by providers to administer the LA Angle test. If you are a patient and need help preparing photos for your providers, you can find help here.
If you continue to need support, or have questions not addressed in this section, feel free to contact us, or your Sole Supports customer service representative.
PART I - Collecting Photos
First, you’ll collect a package of seven photos from your patient, which they should reasonably be able to take themselves so long as they have a camera enabled smartphone. Your patient will need some common household items, a magic marker, a quarter, and a bit of tape, in addition to a smartphone with a working camera.
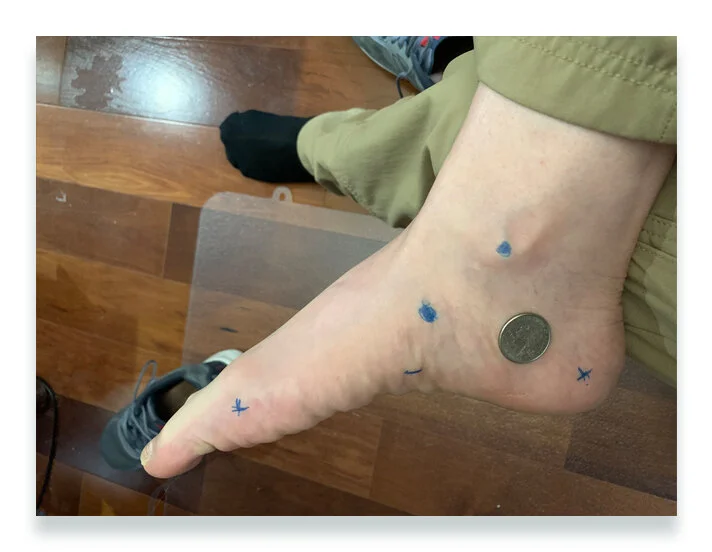
Before taking our photos, we’ll need to ask your patients to mark their feet in four specific places using a magic marker or other similar writing device, so long as it’s visible in a photo. The marks will make it easier for you to find the specific measurement points for the LA Angle later on.
The first point goes on the medial side of the head of the 1st metatarsal.
The Second Point goes at the bony protuberance of the navicular bone, which the patient should noticeably feel while searching around their medial arch.
The third point goes on the medial side of the heel, ideally as level as possible with the first point drawn at the 1st Met.
The fourth and final point goes on the medial malleolus, made by the end of the tibia bone.
Next we need the patient to take the first four photos of their feet, which consists of both a flat, and raised stance for each foot. If your patient has limited mobility, this process can be facilitated either by getting a second person, if possible, to take these photos in your patient’s home, or by using some kind of raised platform, such as a sturdy box, while seated.
Before taking the last three photos of your feet, we then need them to tape a quarter to the medial aspect of the foot, as shown. From here they simply lift one foot over their opposing knee, while seated. We ask them to attempt and point their toes as much as they comfortably can, to induce suppination, before capturing each foot.
Pictured below is an example of such.
For the last photo, they simply need to take a top-down picture of both of their feet side-by-side, after moving their quarter to rest on top of one of their feet.
PART II - Receiving Photos
Your patient will then be asked to send these photos to your email address, where you can download them to a location of your choice on your computer. It’s important that these photos are in the .jpeg format, which should be the common default for photos taken with a smartphone.
We recommend you maintain a healthy file structure when downloading photos, giving each patient their own named folder to place their images, as opposed to saving patient photos in a single library or folder.
PART III - Starting LA Angle for the First Time
You’re now ready to fire up http://laangletest.com and begin uploading your files.
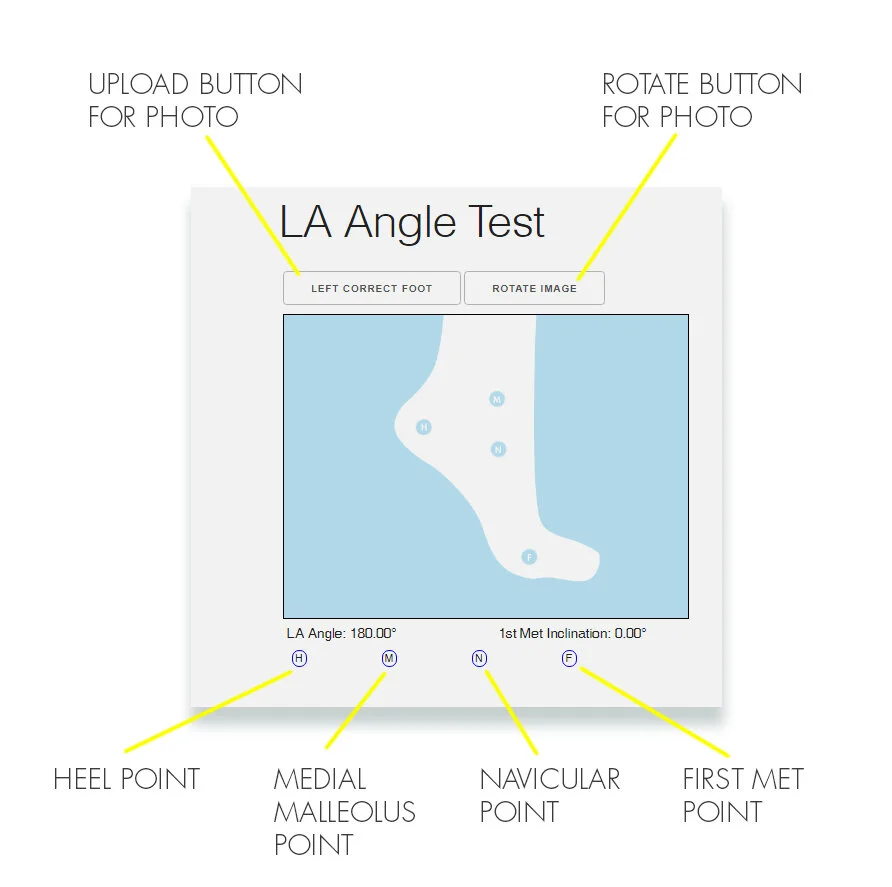
You should see four panels that appear as below.
Simply hit the named pose button (i.e. “Left Uncorrected Foot”) to the upper left of each foot panel to upload a specific photo. The default view of the test shows the proper orientation and the pose of the foot for each of the four panels to aid in navigation. Should your photo be rotated in the wrong direction, simply hit the “Rotate Image” button until they are corrected.
PART IV - Performing the Test
From here, simply click and drag the labelled LA Angle dots below each foot picture and move them to their corresponding placement on the foot, as shown below.
Once you’ve moved all the dots into place, that’s it! You should now see a readout below your photos that both lists the LA Angle difference of each foot, along with the estimated % in plantar fascia tendon reduction possible by correcting this arch.
This information can be crucial in helping to determine if your patient should be wearing orthotics. You may now save your patient’s results as a .pdf file for your own record keeping. We recommend you keep this in the same location as your patient’s original photos, which will ideally already be placed in their own named folder.
PART V - Sending the Results To Solesupports
Should you be ordering orthotics, every provider will be given a specific email address where these orders can be sent. If you do not have this address, feel free to contact us, or simply contact your Solesupports customer service agent to acquire such. We ask that you not place orders through typical email channels, such as the individual email accounts of Sole Supports employees.
To order orthotics, we’ll need the original photos from your patient, along with some minimal information. You can just attach these original photos to an order request. Be sure to include the following information in your email as well, which we need to properly process your order
Your customer number
The patient’s seven photos of their feet
The patient’s home address (for direct shipping of finished orthotics)
The patient’s shoe size
Once received, we’ll promptly send you a confirmation email to let you know that your patient’s orthotics are on their way.


